I developed this HDA for my latest game Land of Hatti. Since manually designing maps for open-world would require an immense amount of time I decided to use a procedural approach for map generation and instancing.
A- Biome Map Generation
Height Map Generation
A procedural height map is created using Perlin noise (pnoise).
This serves as the foundation for determining elevation, including mountains, plains, and valleys.
Water Map Creation
Three types of water bodies are generated:
Sea: Surrounding land tiles.
Rivers: Flowing from high-altitude (high precipitation) areas to the sea, following downward slopes.
Lakes: Formed in specific conditions such as:
High precipitation regions.
Volcanic activity on mountain peaks.
Crater depressions.
Aeolian (wind-formed) basins.
Humidity Calculation
Humidity is determined based on:
Levels of precipitation.
Proximity to water bodies.
Temperature Calculation
Temperature is computed using factors like:
Latitude: North-South location on the map.
Distance to Water: Coastal areas are generally cooler.
Elevation: Higher altitudes have lower temperatures.
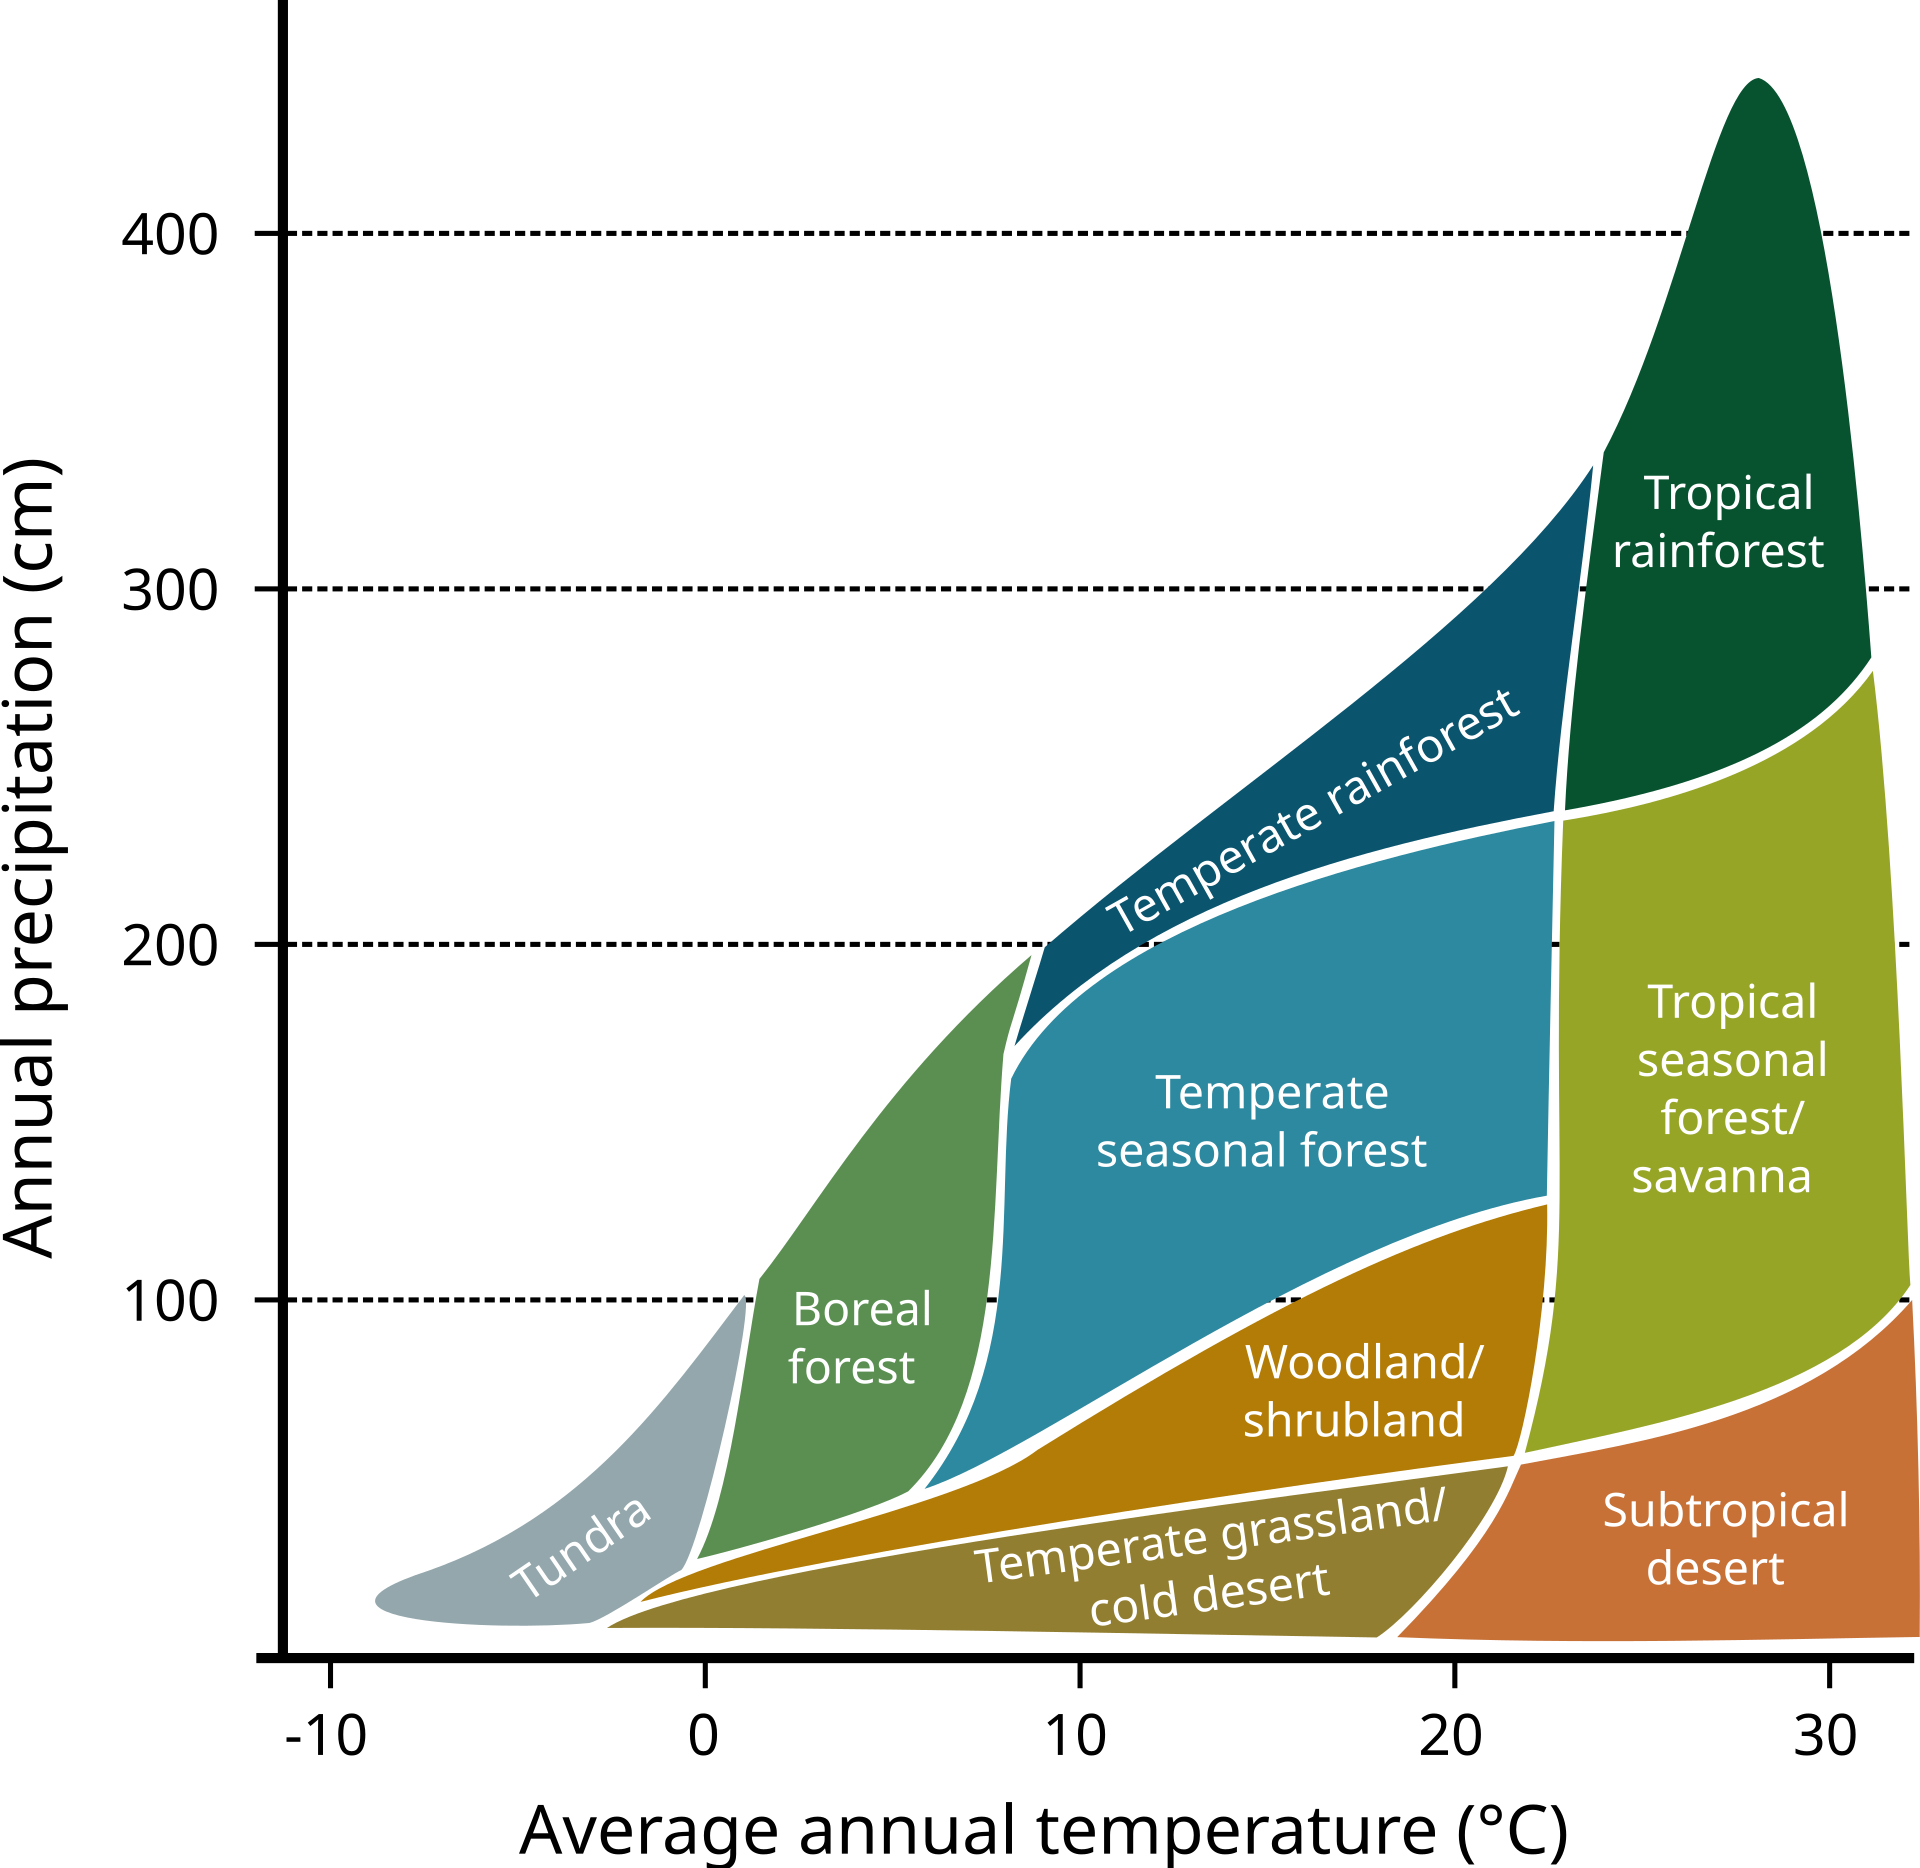
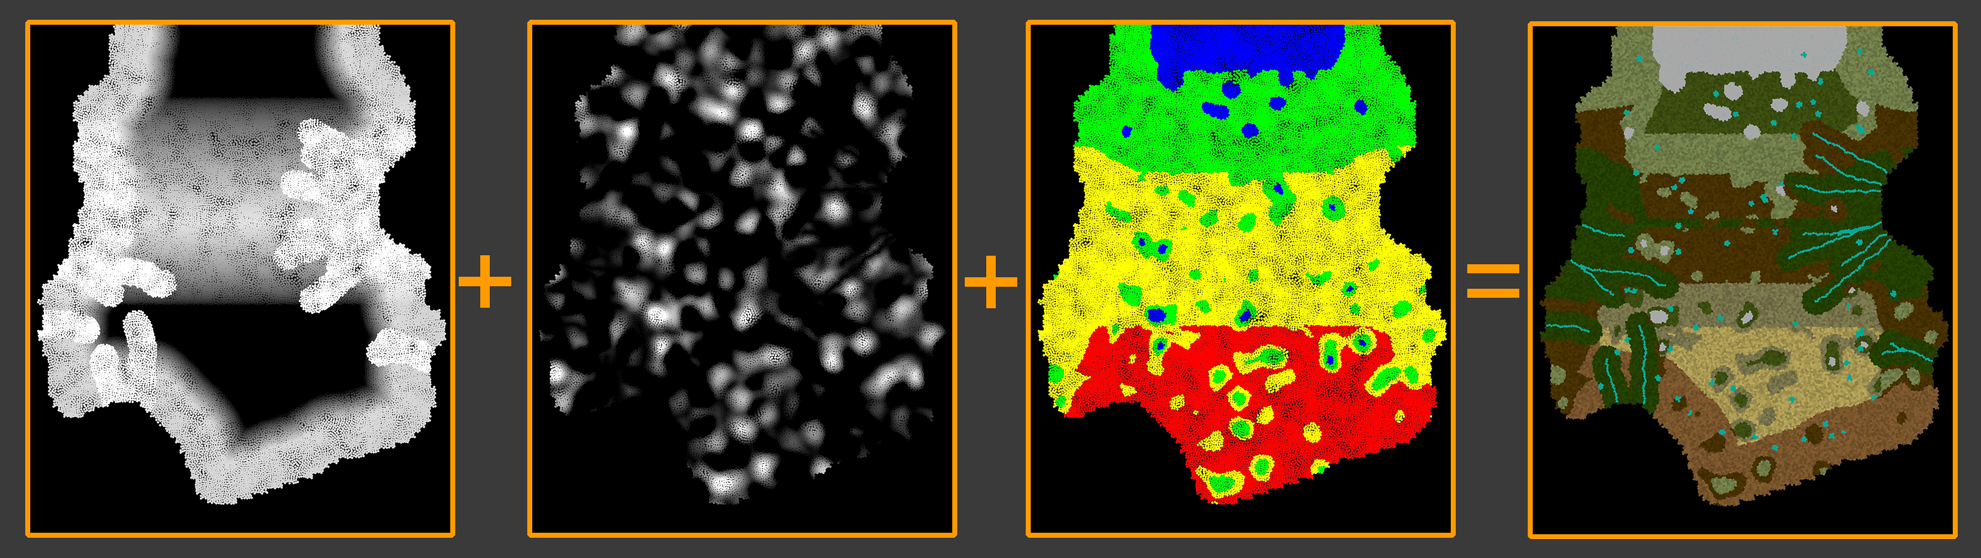
After Temperature and humidity paremeters are calculated, biomes are selected by cross-referencing the a predefined matrix (as illustrated in the image below). This process creates a dynamic and realistic biome map that reflects the natural diversity of ecosystems
sea / humidity / temperature and final biomes
B – INSTANCING ASSETS
Once the biome map is assigned, the scattering process begins. This involves placing various assets like trees, grasses, and rocks across the map in a structured, multi-step process.
Scattering Process
Primary Pass
Larger, primary objects such as trees and big bushes are scattered first.
Secondary Pass
Secondary objects, like grasses, tree-connected elements (e.g., ivy, roots), and flowers, are added in this step.
Final Pass
Non-biome-specific objects like rocks, sticks, and debris are scattered.
Factors such as scatter density, proximity to water, spacing between objects, and occlusions by larger objects are considered to ensure a natural arrangement.
C-EXPORTING WITH UNREAL ENGINE
Scattered assets are exported to Unreal Engine as points with instance data. Each point contains the following information:
s@unreal_instance
Specifies which object to instance, using the full reference directory of the asset in Unreal.
s@unreal_uproperty_CollisionProfileName
Defines the collision profile, such as "BlockAll" or "NoCollision".
i@unreal_num_custom_floats
Indicates the number of custom data channels.
In this case, 4 channels are used:
The first three represent the base color of the object.
The fourth channel determines whether the material should use the object’s vertex color or the point color.
Organizing Assets
To maintain consistency, the same asset structure is used in both Houdini and Unreal. The structure follows a logical hierarchy: Root → Trunk → Branch → Twig → Leaf → Variant.
For example, scattering a bush geometry adheres to this organized structure, as shown in the accompanying image.
This approach ensures efficient asset management and a seamless workflow between Houdini and Unreal Engine.
The script focuses on controlling the state and progression of techtrees in game Ministry of pancemic, written in unity/C# . It manages the UI elements corresponding to these actions, updating their visual states based on their status (active, enable, disable, inProgress). The script also handles the dependencies between actions, ensuring that certain conditions are met before activating or deactivating specific technologies.
SUMMARY:
Tech Activation and Deactivation: The ActivateTech method controls the logic for activating or deactivating technologies. It checks if dependencies are met (e.g., connected technologies must be active) and manages the status of a technology (e.g., from “enable” to “active”).
Progress Handling: The ProgressStart method initiates progress for a technology, and the ActionActivation method manages the status changes (e.g., activation, deactivation, or progress) of a technology, updating the player’s resources (like ecoBudget) and triggering related actions (e.g., vaccine development or building upgrades).
Tree and Dependency Management: Technologies can have dependencies on other technologies or must be completed in a specific order. The script checks and manages these dependencies before allowing a technology to be activated or deactivated.
FUNCTIONS:
colorCtrl(string objName, string statusName)
Changes the color of a UI element based on its status.
Parameters:
objName: The name of the GameObject.
statusName: The status of the object (e.g., active, enable, disable, inProgress).
titleGenerate()
Generates and assigns titles and texts for game actions at the start.
Iterates through the subActions dictionary to set action titles and colors.
progressBarReset()
Resets the progress bars for all actions.
Iterates through the subActions dictionary to reset the progress bars.
activateTech(string action)
Manages the activation and deactivation of technologies based on their current status and dependencies.
Contains nested functions:
void readTrees(): Reads input and output tech trees for the specified action.
void deactivateTree(string actionDeactivate): Deactivates a tech tree if conditions are met.
void activateTree(string actionActivate): Activates a tech tree if conditions are met.
void progressStart(string actionProgress): Starts the progress for a specified action if conditions are met.
This script is designed for creating pedestrian and traffic control in my game, MOP, using C# and Unity. The game map coordinates are read from a dictionary, and agent spawn locations are converted to isometric coordinates. Agents are assigned random locations to move to, and at the end of each street (map’s rows and columns), they can choose to turn left, right, or continue straight. These decisions are made in Cartesian coordinates but are converted to isometric coordinates for rendering. Additionally, the script is useful for spawning crowd agents. Rectangular instance bounds are converted to isometric, and agents are randomly instantiated within these bounds.
Conversation between Cartesian and isometric coordinates.
cartesian to isometric conversion Takes a Vector2 representing Cartesian coordinates (transformCart) and returns a Vector2 representing the equivalent isometric coordinates. The conversion is done using the formulas
    // Converts Cartesian coordinates to isometric coordinates
    public Vector2 cartToIso(Vector2 transformCart)
    {
        Vector2 transformIso;
        transformIso.x = transformCart.x - transformCart.y;
        transformIso.y = (transformCart.x + transformCart.y) / 2;
        // Uncomment the line below for debugging
        // print(transformCart + "Iso>>" + transformIso);
        return transformIso;
    }
Isometric to cartesian conversion: Takes a Vector2 representing isometric coordinates (transformIso) and returns a Vector2 representing the equivalent Cartesian coordinates. The conversion is done using the formulas
    // Converts isometric coordinates to Cartesian coordinates
    public Vector2 isoToCart(Vector2 transformIso)
    {
        Vector2 transformCart;
        transformCart.x = (2 * transformIso.y + transformIso.x) / 2;
        transformCart.y = (2 * transformIso.y - transformIso.x) / 2;
        // Uncomment the line below for debugging
        // print(transformIso + "toCart>>" + transformCart);
        return transformCart;
    }
MotionControl
The motionControl script manages the movement, state, and lifecycle of an object (either a vehicle or pedestrian) in a grid-based environment within a Unity game. It handles spawning, movement direction changes, speed variations, infection states, and object destruction. The script also interacts with various other game components for map preparation, event control, sound, and UI updates.
spawn(): Initializes and spawns the object in the grid, sets its initial position, life duration, speed, and handles infection states and related visual/audio cues.
void spawn()
    {
        // Adjust life and speed based on variations
        life = (int)(life * UnityEngine.Random.Range(lifeVariation.x, lifeVariation.y));
        speed *= UnityEngine.Random.Range(speedVariation.x, speedVariation.y);

        // Randomly select start position within grid
        int startRow = (int)(UnityEngine.Random.Range(0, (MapPrep.rowNum)));
        int startColumn = (int)(UnityEngine.Random.Range(0, (MapPrep.columnNum)));

        currentGrid = new Vector3Int(startRow, startColumn, 0);

        // If the object is secondarily infected and just spawned, set to specific grid
        if (state == "secondaryInfected" && age == 0)
        {
            currentGrid = EventCtrl.secondaryInfectionGrid;
            startRow = currentGrid.x;
            startColumn = currentGrid.y;
        }

        // Set initial world position based on type
        if (type == 0)
            currentPosition = MapPrep.coordinates[startRow][startColumn];
        else if (type == 1)
            currentPosition = MapPrep.coordinatesPed[startRow][startColumn];

        this.gameObject.transform.localPosition = currentPosition;

        // If infected, instantiate alert object and adjust speed
        if (state == "infected" || state == "secondaryInfected")
        {
            speed *= .75f;
            alertObj = Instantiate(alertInfectedPrefab, new Vector3(currentPosition.x, currentPosition.y + 75, currentPosition.z), Quaternion.identity);
            alertObj.transform.SetParent(UI.map_objects.transform, false);

            // Configure the alert object's eventPrefab component
            eventPrefab EventPrefab;
            EventPrefab = alertObj.GetComponent<eventPrefab>();
            EventPrefab.life = life;
            EventPrefab.sourceObject = this.gameObject;

            // Play infection sound
            SoundCtrl.clipPlay("infected");
        }

        targetSelect(); // Select initial target position
    }
targetSelect(): Determines the next target position for the object to move towards based on its current direction and probability to change direction.
 // Method to select the target position
    void targetSelect()
    {
        // List of possible directions
        List<string> directions = new List<string> { "R", "L", "U", "D" };

        int currentRow = currentGrid.x;
        int currentColumn = currentGrid.y;
        int targetColumn = currentColumn;
        int targetRow = currentRow;

        // Remove reverse direction from the list
        if (direction == "R")
            directions.Remove("L");
        else if (direction == "L")
            directions.Remove("R");
        else if (direction == "U")
            directions.Remove("D");
        else if (direction == "D")
            directions.Remove("U");

        // Remove invalid directions based on grid boundaries
        if (currentColumn == 0)
            directions.Remove("L");
        if (currentColumn == (MapPrep.columnNum - 1))
            directions.Remove("R");
        if (currentRow == 0)
            directions.Remove("D");
        if (currentRow == (MapPrep.rowNum - 1))
            directions.Remove("U");

        // Check if the current direction is valid
        bool dirValid = directions.Contains(direction);
        float changeRandSeed = (UnityEngine.Random.Range(0f, 1f));

        // Force direction change if invalid or not set
        if (!dirValid || direction == "NA")
            changeRandSeed = 1;

        // Change direction based on probability
        if (changeRandSeed > 1 - changeDirProb)
        {
            int randDirection = (int)(UnityEngine.Random.Range(0, (directions.Count)));
            direction = directions[randDirection];
        }

        // Update target position based on the selected direction
        if (direction == "R")
        {
            targetColumn = currentColumn + 1;
            objRenderer.sprite = sprites[0]; // Right sprite
        }
        else if (direction == "L")
        {
            targetColumn = currentColumn - 1;
            objRenderer.sprite = sprites[1]; // Left sprite
        }
        else if (direction == "U")
        {
            targetRow = currentRow + 1;
            objRenderer.sprite = sprites[3]; // Up sprite
        }
        else
        {
            targetRow = currentRow - 1;
            objRenderer.sprite = sprites[2]; // Down sprite
        }

        targetGrid = new Vector3Int(targetRow, targetColumn, 0);

        // Set target position based on type
        if (type == 0)
            targetPosition = MapPrep.coordinates[targetRow][targetColumn];
        else if (type == 1)
            targetPosition = MapPrep.coordinatesPed[targetRow][targetColumn];

        currentGrid = targetGrid; // Update current grid position
    }
positionUpdate(): Updates the object’s position towards the target, adjusts its speed, handles aging, and manages the object’s infection alert position.
  // Method to update the object's position
    void positionUpdate()
    {
        if (UI.delay > 0)
        {
            float step = 1 / UI.delay;
            age += step;
            float updatedSpeed = speed * step;
            Vector3 targetDirection = (targetPosition - currentPosition);

            // Move towards the target position
            if (targetDirection.magnitude > (updatedSpeed * .8))
            {
                targetDirection.Normalize();
                currentPosition += (targetDirection * updatedSpeed);
            }
            else if (targetDirection.magnitude <= (updatedSpeed * .8))
            {
                currentPosition = targetPosition;
                targetSelect(); // Select new target position
            }

            this.gameObject.transform.localPosition = currentPosition;

            // Update alert object position if infected
            if (state == "infected" || state == "secondaryInfected")
            {
                if (alertObj != null)
                    alertObj.transform.localPosition = new Vector3(currentPosition.x, currentPosition.y + 75, currentPosition.z);
            }

            // Destroy the object if its age exceeds its life duration
            if (age > life)
                kill();
        }

        // Update the sorting order of the sprite based on its position
        int depth = (int)((currentPosition.y - 1000) * -1) - 1500;
        objRenderer.sortingOrder = depth;
    }
I built an Arduino-powered flight controller that integrates with the Kerbal Space Program (KSP) game using the Kerbal Simpit API. The hardware communicates with the game by loading data in each cycle and sending user inputs back for control.
Features:
Alert Indicators , Displays warnings and critical statuses.
Input buttons for various flight-related commands and indicators.
Rotary Switchs: Used for controlling the LCD menus.
Hardware:
Microcontroller: Controlled with an Arduino Mega for increased input and output capacity.
Expanders: Utilizes 74HC595 Shift Registers and PCF8574 Port Expanders to handle additional inputs and outputs.
Modular Design: All parts are 3D-printed and designed for easy assembly and replacement.
SOFTWARE
Allert Modules
Parameters:
resource: The current value of the resource being monitored.
alertId: An identifier for the alert.
threshold_Y: The threshold value for triggering a yellow alert.
threshold_R: The threshold value for triggering a red alert.
inverted: A flag indicating if the alert logic should be inverted (0 for normal, 1 for inverted).
Logic Flow:
If inverted is 0:
A green alert is triggered if resource is greater than or equal to threshold_Y.
A yellow alert is triggered if resource is between threshold_R and threshold_Y.
A red alert is triggered if resource is less than threshold_R.
void alertSelect(float currentResourceLevel, int alertId, float yellowThreshold, float redThreshold, int isInverted) {
    // Check for valid inverted flag
    if (isInverted != 0 && isInverted != 1) {
        // Handle invalid inverted value, e.g., log an error or set a default behavior
        return;
    }

    // Determine if the alert logic should be inverted
    bool inverted = (isInverted == 1);

    // Set alert levels based on resource level and thresholds
    if ((inverted && currentResourceLevel <= yellowThreshold) || (!inverted && currentResourceLevel >= yellowThreshold)) {
        alertModule("alert", alertId, 1); // Green alert
    } else if ((inverted && currentResourceLevel <= redThreshold && currentResourceLevel > yellowThreshold) ||
               (!inverted && currentResourceLevel >= redThreshold && currentResourceLevel < yellowThreshold)) {
        alertModule("alert", alertId, 3); // Yellow alert
    } else if ((inverted && currentResourceLevel > redThreshold) || (!inverted && currentResourceLevel < redThreshold)) {
        alertModule("alert", alertId, 2); // Red alert
    }
}
Flight Assistant
The flightAssistant function assists in flight control by calculating and applying the required torque adjustments for roll, pitch, and heading to guide an aircraft . This function integrates user-set targets, from LCD menu.
Functionality
Input: Reads target values for heading, pitch, and roll from the user interface (menuArray_values).
Torque Calculation: Uses torqueMeasure to calculate the required torque for each axis, ensuring precise adjustments.
Coordinate Adjustment: Transforms the torque values to account for the roll angle (alpha) and align them with the aircraft’s global frame of reference.
Output: Packages and sends the torque commands to the flight controller as a rotationMessage.
const float DEGREE_TO_RADIAN = 0.01745;
const float TORQUE_MAG = 1000.0;

// Flight Assistant Function
void flightAssistant() {

    // Retrieve target angles
    int target_heading = menuArray_values[0][1];
    int target_pitch = menuArray_values[0][2];
    int target_roll = menuArray_values[0][3];

    // Initialize torques
    float torque_roll = 0.0;
    float torque_pitch = 0.0;
    float torque_heading = 0.0;

    // Calculate torques based on states
    if (!roll_state) {
        torque_roll = torqueMeasure("roll", roll, target_roll);
    }
    if (!pitch_state) {
        torque_pitch = torqueMeasure("pitch", pitch, target_pitch);
    }
    if (!heading_state) {
        torque_heading = torqueMeasure("heading", heading, target_heading);
    }

    // Apply transformation for heading and pitch based on roll
    float alpha = roll * DEGREE_TO_RADIAN; // Convert roll to radians
    float adjusted_heading = (torque_heading * cos(alpha)) + (torque_pitch * sin(alpha));
    float adjusted_pitch = (-torque_heading * sin(alpha)) + (torque_pitch * cos(alpha));

    // Prepare rotation message
    rotationMessage rot_msg;
    rot_msg.setRoll(-TORQUE_MAG * torque_roll);
    rot_msg.setPitch(TORQUE_MAG * adjusted_pitch);
    rot_msg.setYaw(TORQUE_MAG * adjusted_heading);

    // Send rotation message
    mySimpit.send(ROTATION_MESSAGE, rot_msg);
}
Torque Measure: function calculates the required torque adjustment for a specified axis ( roll, pitch, or heading) to align a current angular position with a target angle.
Input Parameters:
dir: Specifies the axis of rotation (“roll”, “pitch”, or “heading”).
currentAngle: The current angular position of the system on the specified axis.
targetAngle: The desired angular position to achieve.
Internal Processing:
Retrieves the current angular velocity (angularW) for the specified axis.
Computes the difference between the targetAngle and the currentAngle to calculate the desired angular velocity (targetW).
Adjusts targetW based on speed constraints, such as speedLimit_rotation and speedAdjust_angle, using a constraining function.
Calculates the torque as the difference between the desired angular velocity (targetW) and the actual angular velocity (angularW).
If the angular difference is very small and the system has reached the target, sets the torque to 0.
Output:
Returns a floating-point value representing the torque adjustment required to move the system toward the targetAngle.
float torqueMeasure(String dir, float currentAngle, float targetAngle) {
    float angularW;

    // Map direction to the corresponding angular velocity
    if (dir == "roll") angularW = angularW_roll;
    else if (dir == "heading") angularW = angularW_heading;
    else if (dir == "pitch") angularW = angularW_pitch;
    else return 0; // Return zero if direction is invalid

    const float speedLimit_rotation = 10; // Maximum rotational speed
    const float speedAdjust_angle = 20;  // Angle adjustment factor

    // Calculate target angular velocity
    float angleDifference = targetAngle - currentAngle;
    float targetW = constrain(angleDifference, -speedAdjust_angle, speedAdjust_angle);
    targetW *= speedLimit_rotation / speedAdjust_angle;

    // Determine torque based on angle difference
    float torque = (abs(angleDifference) <= speedAdjust_angle)
                   ? targetW - angularW
                   : (angleDifference > 0 ? speedLimit_rotation : -speedLimit_rotation);

    // Zero out torque if target reached
    if (abs(targetW) < 0.1 && targetAngle == currentAngle) torque = 0;

    return torque;
}
LCD Menu
The lcd_updateMenu function updates the LCD display to reflect the current menu state. The rotaryUpdate_A and rotaryUpdate_B functions handle input from rotary encoders, allowing users to navigate through the menu and adjust settings by rotating the encoder or pressing its button.
MenuArray_values: Stores menu item labels & values.
lcd_updateMenu is responsible for updating the LCD display with the current menu information. Updates the LCD screen with the current menu and values. Clears the LCD and prints the menu title and values when lcdContentUpdate is true.
void lcd_updateMenu() {
  // Check if the LCD content needs to be updated
  if (lcdContentUpdate) {
    lcd.clear(); // Clear the LCD screen

    // Display the menu title
    lcd.setCursor(0, 0); // Set cursor to the beginning of the first line
    lcd.print("MAIN " + menuArray[subMenu_ID][0]); // Print the main menu title

    // Display the menu items and their values
    for (int i = 1; i < 4; i++) {
      lcd.setCursor(0, i); // Set cursor to the beginning of each line
      // Print the menu item with a selection indicator if it's the current item
      lcd.print((i == item_ID ? ">" : " ") + menuArray[subMenu_ID][i] + ": ");
      lcd.print(menuArray_values[subMenu_ID][i]); // Print the current value of the menu item
    }

    lcdContentUpdate = false; // Reset the update flag
  }
}
rotaryUpdate_A function handles input from the first rotary encoder and updates the menu selection accordingly:Updates item_ID and counter_A based on the rotary encoder’s movement. Sets lcdContentUpdate to true if the encoder is rotated or the button is pressed.
void rotaryUpdate_A() {
  // Read the current state of the rotary encoder pins
  int currentStateRotary_CLK = PCF1.read(rotary_CLK_A);
  int currentStateRotary_DT = PCF1.read(rotary_DT_A);
  int currentStateRotary_SW = PCF1.read(rotary_SW_A);

  // Check if the rotary encoder was turned
  if (currentStateRotary_CLK != lastStateRotary_CLK_A && currentStateRotary_CLK == HIGH) {
    // Determine the direction of rotation
    if (currentStateRotary_DT != currentStateRotary_CLK) {
      counter_A--; // Counter decreases for one direction
    } else {
      counter_A++; // Counter increases for the other direction
    }
    item_ID = abs(counter_A % 4); // Update the selected menu item
    lcdContentUpdate = true; // Set the flag to update the LCD content
  }

  lastStateRotary_CLK_A = currentStateRotary_CLK; // Update the last state

  // Check if the rotary encoder button was pressed
  if (currentStateRotary_SW == LOW && (millis() - lastButtonPress_A > 50)) {
    lcdContentUpdate = true; // Set the flag to update the LCD content
    lastButtonPress_A = millis(); // Update the last button press time
  }
}
rotaryUpdate_B: handles input from the second rotary encoder and updates menu values or submenu selection accordingly: Adjusts subMenu_ID or updates the value of menuArray_values based on the encoder’s position and movement. Uses a secondary variable increment to change the step size (1 or 10) based on button presses.
void rotaryUpdate_B() {
  int delta = 0; // Initialize the delta for changes
  // Read the current state of the rotary encoder pins
  int currentStateRotary_CLK = PCF1.read(rotary_CLK_B);
  int currentStateRotary_DT = PCF1.read(rotary_DT_B);
  int currentStateRotary_SW = PCF1.read(rotary_SW_B);

  // Check if the rotary encoder was turned
  if (currentStateRotary_CLK != lastStateRotary_CLK_B && currentStateRotary_CLK == HIGH) {
    lcdContentUpdate = true; // Set the flag to update the LCD content
    delta = (currentStateRotary_DT != currentStateRotary_CLK) ? -1 : 1; // Determine the direction of rotation

    if (item_ID == 0) {
      // Update the submenu selection
      subMenu_ID = constrain(subMenu_ID + delta, 0, subMenu_NUM - 1);
    } else {
      // Update the value of the selected menu item
      menuArray_values[subMenu_ID][item_ID] += delta * increment;
    }
  }

  lastStateRotary_CLK_B = currentStateRotary_CLK; // Update the last state

  // Check if the rotary encoder button was pressed
  if (currentStateRotary_SW == LOW && (millis() - lastButtonPress_B > 50)) {
    increment = (increment == 1) ? 10 : 1; // Toggle the increment value
    lastButtonPress_B = millis(); // Update the last button press time
  }
}
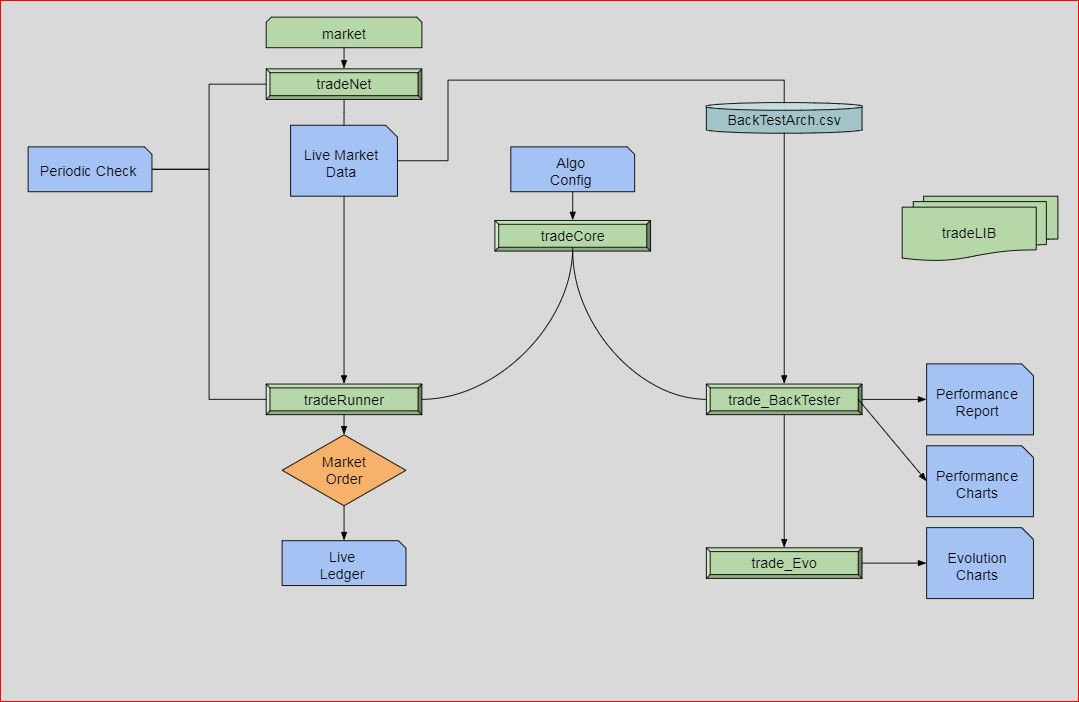
TradeRunner is a trading platform I developed and tested between 2017 and 2019. Initially designed as a simple automation tool for a friend, it evolved as I integrated an algorithm to identify recurring trade patterns. To refine the algorithm’s performance, I built additional modules, ultimately transforming it into a fully functional trading platform.
As one of my first Python projects, I deliberately limited the use of external libraries to just “NumPy” and “Pandas.” This approach helped deepen my understanding of Python and algorithm design and made the development process more engaging. The diagram above outlines a simplified version of the model pipeline.
Modules:
tradeNet: Communicates with markets and archives historical data at regular intervals.
tradeCore: Processes market data (live or backtest) to predict patterns.
tradeRunner: Executes tradeCore in real-time market conditions.
tradeBackTester: Runs tradeCore with historical data to evaluate algorithm performance.
tradeEvo: Optimizes the algorithm’s performance by adjusting its configuration parameters.
Hardware
The system is structured into three main components:
Practice: Running experimental algorithms on live data while archiving all forex data for future analysis. The practice system operates on a Raspberry Pi 3B with 1GB RAM and a 1.2GHz quad-core CPU.
Live: Running the main algorithms to make real-time trade decisions. The live system runs on a Raspberry Pi 3B+ with 1GB RAM and a 1.4GHz quad-core CPU.
BackTesting & Evolution: These algorithms are executed on a workstation with a Ryzen 9550 CPU (16 cores) and 64GB of RAM.
Later, RAM limitations were encountered when analyzing and archiving data for 20+ forex pairs. To resolve this, a Raspberry Pi 4 with 4GB of RAM was incorporated into the setup. The system is designed for 24/7 operation and has been running smoothly for over a year and a half.
Algoritms
MomentumAnalyse: This function analyzes trends in an array of mean values by calculating slopes over multiple steps and comparing them to a threshold. It performs the analysis for a specified number of passes, If the trend consistently meets the slope condition, the function returns 1 (indicating momentum); otherwise, it returns 0.
def momentumAnalyse(meanArray, listSize, steps, slope, passes, condition):
    """
    Function to analyze trends in a mean array.
    v2: 24.11.2024  : optimisation
    Parameters:
        meanArray (list): Array of mean values.
        listSize (int): Size of the mean array.
        steps (int): Number of steps for calculating slope.
        slope (float): Slope threshold for comparison.
        passes (int): Number of passes to check the slope condition.
        condition (str): Condition to check ('smaller' or 'bigger').

    Returns:
        int: 1 if the trend meets the condition, otherwise 0.
    """

    def calculate_slope(meanArray, n, steps, factor):
        return ((1 - (meanArray[n - (steps * factor)] / meanArray[n - (steps * (factor - 1))])) / steps) * 1000000

    if listSize < steps * passes:
        raise ValueError("listSize must be at least steps * passes")

    momentum = 0
    n = listSize
    comparison_op = (lambda x, y: x < y) if condition == "smaller" else (lambda x, y: x > y)

    for i in range(1, passes + 1):
        if comparison_op(calculate_slope(meanArray, n, steps, i), slope):
            momentum = 1
        else:
            momentum = 0
            break

    return momentum
TripleConditionAnalyses: This function combines momentum and shock analysis to evaluate market conditions. It checks for specific trends using the momentumAnalyse function, updates the shock value based on the result, and ensures it stays within a defined range (0 to 1). If the shock value drops below a threshold, it adjusts the momentum accordingly. This function returns updated momentum and shock values, which can help make buy decisions.
def tripleConditionAnalyses(mean_mid_array, array_length, shock_steps, shock_slope, shock_passes, up_steps, up_slope, up_passes, shock, shock_decay, min_decay_shock, condition):
    """
    Analyze market conditions using momentum and shock analysis.

    Parameters:
        mean_mid_array (list): Array of mean mid values.
        array_length (int): Size of the mean mid array.
        shock_steps (int): Number of steps for shock analysis.
        shock_slope (float): Slope threshold for shock analysis.
        shock_passes (int): Number of passes for shock analysis.
        up_steps (int): Number of steps for upward momentum analysis.
        up_slope (float): Slope threshold for upward momentum analysis.
        up_passes (int): Number of passes for upward momentum analysis.
        shock (float): Current shock value.
        shock_decay (float): Decay rate for the shock value.
        min_decay_shock (float): Minimum decay shock value.
        condition (str): Condition for shock analysis ('smaller' or 'bigger').

    Returns:
        tuple: Updated momentum and shock values.
    """
    shock_current = momentumAnalyse(mean_mid_array, array_length, shock_steps, shock_slope, shock_passes, condition)
    momentum_mid = momentumAnalyse(mean_mid_array, array_length, up_steps, up_slope, up_passes, "bigger" if condition == "smaller" else "smaller")

    shock += shock_current
    shock = max(min(shock - shock_decay, 1), 0)  # Ensuring shock remains between 0 and 1

    if shock < min_decay_shock:
        momentum_mid = 0

    return momentum_mid, shock
RsiAnalyse: This function calculates the Relative Strength Index (RSI), a momentum oscillator that measures the speed and change of price movements. It computes the average gains and losses over a given period, then calculates the RSI based on these values. The function returns the RSI, a value that helps assess whether an asset is overbought or oversold.
def rsiAnalyse(rsiPeriods, rsiBlockSize, meanArray):
    """
    Function to analyze relative strength index (RSI).

    Parameters:
        rsiPeriods (int): Number of periods to consider for RSI calculation.
        rsiBlockSize (int): Size of each block in terms of array elements.
        meanArray (list or np.array): Array of mean values for the asset.

    Returns:
        float: Calculated RSI value.

    Version History:
        1.0: First version.
		2.0 : 24.11.2025: cleanup
    """

    if len(meanArray) < rsiPeriods * rsiBlockSize:
        raise ValueError("meanArray is too short for the given rsiPeriods and rsiBlockSize.")

    gains = []
    losses = []

    for r in range(rsiPeriods):
        # Calculate start and end indices for the current block
        start_idx = -((rsiPeriods - r) * rsiBlockSize)
        end_idx = start_idx + rsiBlockSize
        difference = meanArray[end_idx] - meanArray[start_idx]

        if difference > 0:
            gains.append(difference)
        else:
            losses.append(abs(difference))

        # Track the current gain/loss for the last period
        if r == rsiPeriods - 1:
            currentGain = max(difference, 0)
            currentLoss = max(-difference, 0)

    averageGain = np.mean(gains) if gains else 0
    averageLoss = np.mean(losses) if losses else 0

    if averageLoss == 0:
        RSI = 100
    else:
        RS = averageGain / averageLoss
        RSI = 100 - (100 / (1 + RS))

    return RSI
calculate_macd function calculates the Moving Average Convergence Divergence (MACD) and its related components for a given set of price data. This indicator used to identify trends and potential buy or sell signals in financial markets.
EWMA Exponential Moving Averages :
MACD Line Calculation: The MACD line is calculated as the difference between the fast and slow EWMA.
Signal Line Calculation: The signal line is calculated as the EWMA of the MACD line over a specified time span (signal).
MACD Histogram Calculation: The MACD histogram is computed as the difference between the MACD line and the signal line.
Return Values: The function returns the MACD line, the signal line, and the MACD histogram.
def calculate_macd(prices, slow=26, fast=12, signal=9):

    # Calculate the fast exponential weighted moving average (EWMA)
    exp1 = prices.ewm(span=fast, adjust=False).mean()

    # Calculate the slow exponential weighted moving average (EWMA)
    exp2 = prices.ewm(span=slow, adjust=False).mean()

    # Calculate the MACD line as the difference between the fast and slow EWMA
    macd = exp1 - exp2

    # Calculate the signal line as the EWMA of the MACD line
    signal_line = macd.ewm(span=signal, adjust=False).mean()

    # Calculate the MACD histogram as the difference between the MACD line and the signal line
    macd_histogram = macd - signal_line

    # Return the MACD line, signal line, and MACD histogram
    return macd, signal_line, macd_histogram
The monteCarlo This function is using Monte Carlo simulation for evaluating an investment strategy
Function Inputs:
Initial investment
Win/loss percentage
Profit loss ratio
Number of trades per year
Number of years to apply test
The function returns a dictionary these outputs;
YearlyReturn:value of the fund at the end of each year
MaxDrawDown: Maximum drawdown is defined as the largest drop from a peak to a trough in the value of the fund within a year, helps measure the risk of the investment strateg
Fitness: is calculated as the ratio of the fund value at the end of the year to the maximum drawdown value within that year. Fitness list helps evaluate the robustness and efficiency of the investment strategy. A higher fitness value indicates a better performance relative to the risk taken, meaning that the fund managed to recover well from its drawdowns.
def monteCarlo(initialFund, orderPercentage, profitPT, lossPT, tradeNumPY, tradeYears, winFailRatio):
    import logging

    logging.basicConfig(level=logging.INFO)
    logging.info("Starting Monte Carlo simulation")

    fund = initialFund
    yearlyReturn = []
    tradeReturn = []
    maxDrawDown = []
    fitness = []

    for i in range(tradeYears):
        for n in range(tradeNumPY):
            if rollDice(winFailRatio):
                fund += (profitPT * 0.01 * orderPercentage * 0.01 * fund)
            else:
                fund -= (lossPT * 0.01 * orderPercentage * 0.01 * fund)
            tradeReturn.append(fund)

        try:
            minTradeReturn = min(tradeReturn)
            maxDrawDown.append(minTradeReturn)
            fitness.append(fund / minTradeReturn)
            tradeReturn.clear()
            yearlyReturn.append(fund)
            fund = initialFund
        except ValueError as e:
            logging.error(f"Error calculating yearly summary: {e}")
            continue

    monteCarloDict = {
        "yearlyReturn": yearlyReturn,
        "maxDrawDown": maxDrawDown,
        "fitness": fitness
    }

    logging.info("Monte Carlo simulation complete")
    return monteCarloDict
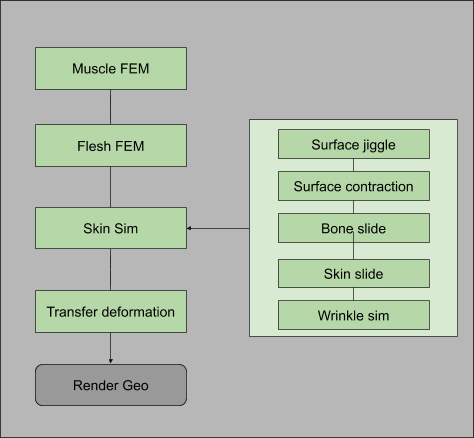
The MUSCLE & FLESH SETUP is a versatile toolset designed to create realistic flesh and muscle simulations. I started to develop it inside Maya ,and by time all cfx part is transfered to houdini. Tool combines dynamic muscle anatomy, FEM simulations, surface dynamics, skin sliding, and wrinkle simulations to deliver lifelike muscle and flesh motion.
The workflow is divided into three core stages:
Muscle Sim – Handles tension-driven dynamics for muscle behavior.
Flesh Sim – FEM-based solid simulations for realistic deformation.
Skin Sim – Adds superficial effects like jiggles, slides, and wrinkles.
Each stage is modular, allowing flexibility in use, with the exception of muscle simulation, which is integral to the process. This tool is built for precision, adaptability, and high-quality results across diverse projects.
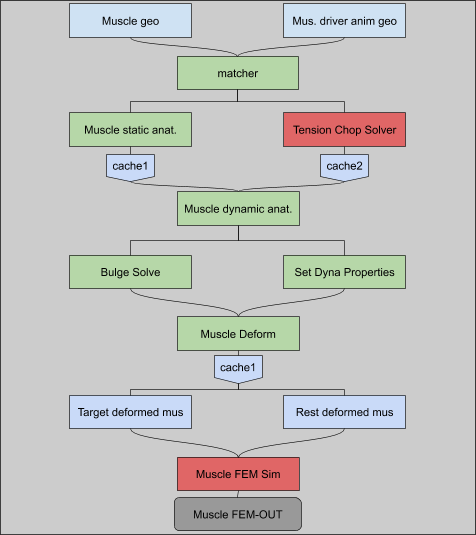
A-Muscle Sim
Static Anatomy Setup
Muscle-to-Tendon Ratio: Adjusts how much of the muscle behaves like a tendon, with tendons dominating near bone attachment points. This defines key FEM simulation properties like stiffness and mass. Independent Simulation: Muscles are simulated without skin, bones, or flesh, focusing on surface movement while maintaining their overall shape.
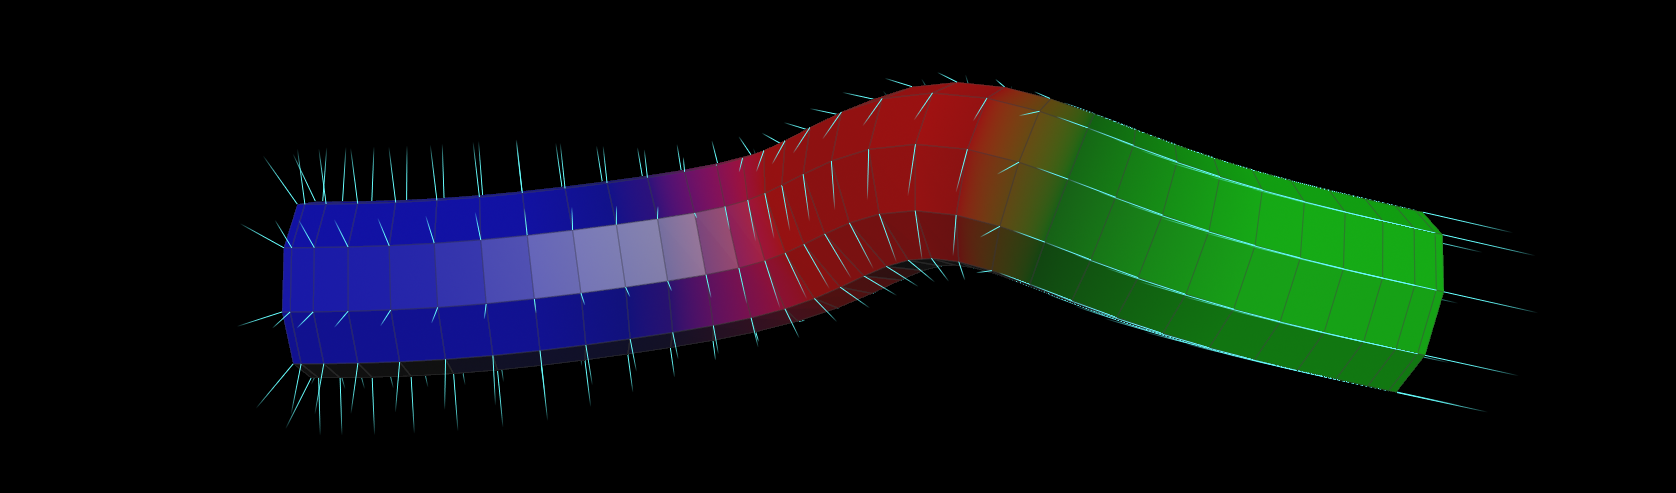
Tension Solver
Tracks muscle tension and contraction during animation by monitoring area changes. Anticipates motion with stiffness adjustments before movement and relaxes muscles after they stop moving. Handles realistic muscle behavior, including: Pre-motion anticipation Contraction twitches Relaxation when inactive
Convert muscle stretch to tension
Convert contraction and extreme muscle stretch to contraction>
Dynamic Anatomy
Dynamic Properties Transfer: Pass properties like tension and stiffness from drivers to muscle geometry for FEM simulation. Bulge Solve: Converts muscle contraction into visible bulges for extra realism. Dynamic Adjustments: Adapts stiffness, strength, and other properties based on muscle state.
Deformation and Simulation
Combines two inputs for FEM simulation: Animation-based deformation for target positions and property updates. Rest-length deformation for updating muscle rest lengths based on bulges. Outputs realistic muscle motion and shape changes through FEM simulation. This streamlined approach ensures muscles respond naturally to tension and movement while keeping simulations efficient.
B_FLESH SIM
This process prepares solid geometry for FEM simulation by assigning internal anatomical properties and dynamic behaviors. While properties can be manually set, using animated skeletons and muscle geometry automates much of the workflow.
Key Steps:
Solid Prep
Create an internal structure by remeshing the surface and converting it into a solid object.
Optionally, add finer resolution near the skin for details like wrinkles.
Anatomy Prep
Assign anatomical properties (e.g., muscle, fat, skin) to the solid geometry using inputs like skeleton and muscle geometries.
Dynamic properties like stiffness, mass, and target strength are applied based on these anatomical definitions.
Local Relax & Sanity Check
Flag problematic areas (e.g., intersections or non-uniform deformation) for softening or dynamic adjustment.
Automatically identify and relax intersecting geometry for smoother results.
Deformation
Deform the solid geometry using input animation, muscle FEM simulation, or skeleton animation.
Fine-tune deformation to preserve surface details while smoothing internal geometry for simulation.
Flesh Simulation
Perform the FEM simulation with dynamic properties applied.
Deform the skin based on simulation output and optionally blend it with the input animation for enhanced results.
C_SKIN SIM
Surface Dynamics
Adds superficial effects like jiggle, contraction, and ripples:
Jiggle Solve: Creates jiggle effects for motions like footsteps or sudden movements.
Contraction Solve: Simulates muscle twitches using contraction data.
Ripple Solve (WIP): Generates ripples from foot impacts or rapid motions.
Skin Slide Simulation
Ensures skin slides naturally over bones and muscles:
Bone Slide: Aligns flesh sim output to bones for realistic movement.
Skin Slide: Aligns surface dynamics with flesh simulation or bone output.
Includes steps to clean errors, mask regions, and refine sliding behavior.
Wrinkle Simulation
Adds fine wrinkles in compressed areas using cloth simulation with high precision.
Blend All Dynamics
Combines jiggle, slide, and wrinkle effects for the final output.
Automated Biped Rigging Tool Built between 2008 and 2012, this biped rigging tool was my go-to solution for fast-paced commercial projects, helping rig around 200 characters along the way. It focused on simplicity and animator-friendly controls, making it easier to get characters production-ready without slowing down the workflow. I’ve been planning to make the tool public for a while now, but the code isn’t quite in the best shape. Hopefully, I’ll find the time to clean it up and maybe even convert it to Python.
Key Features
FK & IK Torso Control:
Independent Chest and Hip Transform Control: Allows animators to isolate movements
Upper & Lower Arm Twist: Smooth and natural arm twisting
Functionality: Script generates and controls various noise patterns applied to geometry in Houdini. It creates three distinct types of noise, blends or combines them, and outputs the result as the Cd attribute. Uses second inputs Cd or deformation attribute to deform noise space.
Parameters:
type (int): The type of noise to generate (0 for Aligator, 1 for Perlin, 2 for Sparse Convolution, 3Worley noise. 4:Voronoi noise)
deformDomain (float): Controls the amount of noise’s domain deformation. Instead of using @P uses (v@P + v@domainDeformation) for generation noise patern.
deformation (vector): Specifies the deformation vector parameter. By default, it uses the Cd attribute from the second input.
Noise1D: Determines the application of generated noise.
/*
Script:     noiseCtrl
Version:    1.0

Overview and Functionality
Script generates and controls various noise patterns applied to geometry in Houdini.
It creates three distinct types of noise, blends or combines them, and outputs the result as the Cd attribute. Uses second inputs Cd or deformation attribute to deform noise space.

Parameters:
type (int): The type of noise to generate (0 for Aligator, 1 for Perlin, 2 for Sparse Convolution, 3Worley noise. 4:Voronoi noise.).
domainDeform (float): Controls the amount of noise's domain deformation. Instead of using @P uses (v@P + v@domainDeformV) for generation noise patern.
domainDeformV (vector): Specifies the deformation vector parameter. By default, it uses the Cd attribute from the second input.
Noise1D: Determines the application of generated noise.


*/

vector freq_A = chv("freq_A");
vector offset_A = chv("offset_A");

vector freq_B = chv("freq_B");
vector offset_B = chv("offset_B");

vector freq_C = chv("freq_C");
vector offset_C = chv("offset_C");

vector freq;
vector offset ;

//noisePrep

vector    noiseType =   chv("type_ABC");


float   amp_A     =   chf("amp_A");
float   rough_A   =   chf("roughness_A");
float   atten_A   =   chf("attenuation_A");;
float   turb_A    =   chf("turbulance_A");

float   amp_B     =   chf("amp_B");
float   rough_B   =   chf("roughness_B");
float   atten_B   =   chf("attenuation_B");;
float   turb_B    =   chf("turbulance_B");

float   amp_C     =   chf("amp_C");
float   rough_C   =   chf("roughness_C");
float   atten_C   =   chf("attenuation_C");;
float   turb_C    =   chf("turbulance_C");


float noiseGen(int type; vector position; vector freq; vector offset;float amp ;float rough; float atten; int turb;   ) {

    float resultNoise ;
        vector jitter = set(1, 1,1); ;
        vector noiseVal;
        int seed;
        float f1, f2, f3, f4;
        vector pos1, pos2;

    if (type==0)resultNoise = anoise((position * freq + offset ) ,  turb, rough, atten); //aligator
    if (type==1)resultNoise = onoise((position * freq + offset ) ,  turb, rough, atten); //orig.Perline
    if (type==2)resultNoise = snoise((position * freq + offset ) ,  turb, rough, atten); // Sparse Convolution
    if (type == 3) {
                wnoise((position * freq + offset ) , seed, f1, f2, f3, f4);
                resultNoise = f1;
        }
        if (type == 4) {
                vnoise( (position * freq + offset ) , jitter, seed, f1, f2, pos1, pos2);
                pos1 = (pos1 - offset) / freq;
                pos2 = (pos2 - offset) / freq;
                float vnoise = f1;
                resultNoise = f1;
        }
        resultNoise*=amp;
        return resultNoise;

}

vector noiseVal;
int Noise1D = chi("Noise1D");
float  domainDeform = chf("domainDeform");
vector domainDeformV ;

if (domainDeform>0){
    domainDeformV = point(1,"Cd",@ptnum);
    domainDeformV  *= domainDeform;
}


if(Noise1D==0 || Noise1D==1 || Noise1D>3  ) noiseVal.x = noiseGen( noiseType.x , v@P+domainDeformV , freq_A , offset_A ,amp_A ,rough_A, atten_A, turb_A);
if(Noise1D==0 || Noise1D==2 || Noise1D>3  ) noiseVal.y = noiseGen( noiseType.y , v@P+domainDeformV , freq_B , offset_B ,amp_B ,rough_B, atten_B, turb_B);
if(Noise1D==0 || Noise1D==3 || Noise1D>3  ) noiseVal.z = noiseGen( noiseType.z , v@P+domainDeformV , freq_C , offset_C ,amp_C ,rough_C, atten_C, turb_C);

noiseVal.x = chramp("ramp_A",noiseVal.x);
noiseVal.y = chramp("ramp_B",noiseVal.y);
noiseVal.z = chramp("ramp_C",noiseVal.z);


if(Noise1D!=0){
if(Noise1D==1) noiseVal = noiseVal.x;
if(Noise1D==2) noiseVal = noiseVal.y;
if(Noise1D==3) noiseVal = noiseVal.z;
if(Noise1D==4) noiseVal = length(noiseVal);
if(Noise1D==5) noiseVal = (noiseVal.x*noiseVal.y*noiseVal.z);
}


@Cd = noiseVal ;
The script connects points in a point cloud with polylines (primitives) based on the following rules:
Points are connected if they are within a defined search radius (minSearchRadius-maxSearchRadius)
Points are only connected if they belong to different classes
Points are not connected if they are already neighbors
If the targetPt attribute exists, connections are only made externally
UseCase:
Generating procedural geometry between points in a point cloud.
Creating connections between points while respecting grouping (via the class attribute)
/*
Script:     connectAdjacent
Version:    2.1
Author:     Ceyhan Kapusuz
ver_1_0     01.06.2018
ver_2.0     27.11.2025 +codeCleanup
ver_2.1     01.2025 +refactoring and improvements
The script connectAdjacent connects points in a point cloud with polylines (primitives) based on the following rules:

Points are connected if they are within a defined search radius (minSearchRadius-maxSearchRadius)
Points are only connected if they belong to different classes
Points are not connected if they are already neighbors
If the targetPt attribute exists, connections are only made externally

UseCase:
Generating procedural geometry between points in a point cloud.
Creating connections between points while respecting grouping (via the class attribute)
*/

float minSearchRadius = ch("minSearchrad");
float maxSearchRadius = ch("maxSearchrad");
int maxConnections = chi("maxconnection");

int usePoints = chi("usePoints");
int createClassAttr = chi("createClassAttr");
int connectionCount = 0;

// Check if class attribute exists, create if missing
if (!haspointattrib(0, "class")) {
    warning("Non-existent attribute: class. Creating class attribute from point number.");
    i@class = @ptnum;
}

// Remove primitives if usePoints is enabled
if (usePoints) {
    removeprim(0, @primnum, 0);
}

// Find nearby points within the search radius
int nearPts[] = nearpoints(0, @P, maxSearchRadius);
int neighborPts[] = neighbours(0, @ptnum);
int connectedPts[];

foreach (int npt; nearPts) {
    // Skip if the point is itself, a neighbor, or in the same class
    if (npt == @ptnum || npt == neighborPts[0] || npt == neighborPts[1]) {
        continue;
    }

    int nearPointClass = point(0, "class", npt);
    if (nearPointClass == @class) {
        continue;
    }

    // Check if the point is already connected
    int isAlreadyConnected = 0;
    foreach (int connectedPt; connectedPts) {
        if (npt == connectedPt) {
            isAlreadyConnected = 1;
            break;
        }
    }

    if (!isAlreadyConnected) {
        push(connectedPts, npt);

        // Calculate distance between points
        vector nptPos = point(0, "P", npt);
        float dist = distance(@P, nptPos);

        // Check minimum distance constraint and target point condition
        if (dist > minSearchRadius && @targetPt == 0) {
            int line = addprim(0, "polyline");
            addvertex(0, line, @ptnum);
            addvertex(0, line, npt);

            // Store connection info
            i@startPt = @ptnum;
            i@endPt = npt;

            connectionCount++;

            // Stop if max connections reached
            if (connectionCount >= maxConnections) {
                break;
            }
        }
    }
}
Scatter & instance tool.
Reads normal and tangent vectors, to create orient attribute .
This script is designed for controlling the instancing of objects along curves or surfaces in Houdini. It generates an @orient @pscale and @isntancepath attributes for each point to manage the scattering of instance objects.
Functionality:
Gravity Application: Gravity is applied to the @up vector, simulating a downward force. Usefull when instances branches or leaves.
Re-alignment: The @up, @N, and @dir vectors are adjusted for correct orientation.
Density-Dependent Scaling: The scale of the scattered instances is adjusted based on the density of points.
Rotation & Scale Control: Rotations are applied along the X, Y, and Z axes, with random offsets to create variation.
Function: Isolates the largest component of a vector, zeroes the other components, and normalizes the result.
/*
Script:     vectorOrtogonal
Version:    1.0
ver_1_0     27.11.2024
Function: Isolates the largest component of a vector, zeroes the other components,
and normalizes the result.
*/

vector inputVec = @N;
// Find the largest component
float maxComp = max(inputVec.x, max(inputVec.y, inputVec.z));

// Isolate the largest component and zero the others
if (inputVec.x == maxComp)
    inputVec.y = inputVec.z = 0;
else if (inputVec.y == maxComp)
    inputVec.x = inputVec.z = 0;
else
    inputVec.x = inputVec.y = 0;

inputVec = normalize(inputVec); // Normalize
@N= inputVec;
RayProject
This script projects points onto a target geometry using ray intersection. Instead of projection, points can be tagged with attribute (Cd here). Similar functionality with ray sop, This script is used to create a mask for objects that are occluded from the camera’s view. It identifies cases where an object lies between the camera and the target surface,
/*
Script:     Ray Projection
Version:    1.1
ver_1_0     27.11.2024 - Initial version
// Function: Projects points onto a target geometry using ray intersection.
//           Updates point positions and colors based on the closest hit.
*/

// Get the target geometry (assume it's in the second input by default)
int target_geo = 1;


// Get the current point's position and normal
vector orig = @P;
vector dir = normalize(@N) * 1e6; // Scale the direction to a large distance

// Arrays to store intersection results
vector hit_positions[]; // Positions of the hits
int hit_prims[]; // Primitives hit
vector hit_uvs[]; // UV coordinates of the hits
float tol = 0.01; // Intersection tolerance
float ttol = 0.01; // Triangle tolerance

// Perform the ray intersection
int num_hits = intersect_all(target_geo, "", orig, dir, hit_positions, hit_prims, hit_uvs, tol, ttol);

// If there are hits, update the point position and color
if (num_hits > 0) {
    // Initialize variables for the closest hit
    float min_dist = distance(orig, hit_positions[0]);
    vector closest_hit = hit_positions[0];

    // Iterate over all hits to find the closest one
    for (int i = 1; i < num_hits; i++) {
        float dist = distance(orig, hit_positions[i]);
        if (dist < min_dist) {
            min_dist = dist;
            closest_hit = hit_positions[i];
        }
    }

    if(`ch("project")`==true){
    // Update the point position to the closest hit position
    @P = closest_hit;
    }

    // Color the point to indicate it was hit
    @Cd = set(1, 0, 0); // Set the color to red
} else {
    // Color the point to indicate no hit
    @Cd = set(0, 0, 1); // Set the color to blue
}
CurveForce
Function: Applies directional, suction, orbital, and input forces along a curve. Uses ramps to control force influence based on curveu. Visualizes force influence using Cd. Usefull on pop curve force, or general force field generation.
/*
Script:     curveForce
Version:    1.3
Author:     Ceyhan Kapusuz
ver_1_2     27.11.2024 - Initial version
ver_1_3     01.2025 - Refactored for clarity and robustness

// Function: Applies directional, suction, orbital, and input forces along a curve.
//           Uses ramps to control force influence based on curveu.
//           Visualizes force influence using Cd.
*/

// Ensure required attributes exist
if (!haspointattrib(0, "tangentu") || !haspointattrib(0, "N") || !haspointattrib(0, "curveu")) {
    error("Missing required attributes: tangentu, N, or curveu.");
    return;
}

// Define force directions
vector directionVelo = normalize(v@tangentu); // Direction along the curve
vector suctionVelo = normalize(v@N);         // Suction direction (normal to the curve)
vector inputVelo = v@v * chf("inputV");      // Input velocity (scaled by parameter)
vector orbitalVelo = normalize(cross(@N, @tangentu)); // Orbital velocity (perpendicular to tangent and normal)

// Evaluate ramps based on curveu
float emissionAlong = chramp("emissionRamp", @curveu);       // Emission influence
float directionAlong = chramp("directionalForceRamp", @curveu); // Directional force influence
float suctionAlong = chramp("suctionRamp", @curveu);         // Suction force influence
float orbitalAlong = chramp("orbitalRamp", @curveu);         // Orbital force influence

// Calculate force vectors
vector directionalVelocity = directionVelo * chf("directionalMag") * directionAlong;
vector suctionVelocity = suctionVelo * chf("suctionMag") * suctionAlong;
vector orbitalVelocity = orbitalVelo * chf("orbitalMag") * orbitalAlong;

// Combine forces and apply magnitude
v@v = (directionalVelocity + suctionVelocity + inputVelo + orbitalVelocity) * chf("magnitude");

// Calculate force (optional, if needed)
v@force = v@v * chf("forceMag");

// Visualize influence using Cd
@Cd.r = orbitalAlong; // Red channel: Emission influence
@Cd.g = directionAlong; // Green channel: Directional force influence
@Cd.b = suctionAlong;   // Blue channel: Suction force influence
BlendControl
function: blend in given time range user inputs for different blendTypes: 0=linear, 1=smooth step, 2=spline, 3=exponential, 4=logarithmic, and 5=sinusoidal transitions.
/*
Script:     blendCtrl
Version:    1.0
Author:     Ceyhan Kapusuz
ver_1_0     04.11.2019

//function
blend in given time range
0=linear, 1=smooth step, 2=spline, 3=exponential, 4=logarithmic, and 5=sinusoidal transitions.
*/


int blendStart = chi("blendStart");
int blendEnd = chi("blendEnd");

float startVal = ch("startVal");
float endVal = ch("endVal");

int transitionType = chi("transitionType");
float smoothRollOff = ch("smoothRollOff");
float transition = fit(@Frame, blendStart, blendEnd, 0, 1);

// Get the attribute name from the parameter
string attrName = chs("attributeName");

// Variable to hold the calculated value
float attrValue;

if (transitionType == 0) {
    attrValue = lerp(startVal, endVal, transition); // Linear
} else if (transitionType == 1) {
    attrValue = smooth(startVal, endVal, transition, smoothRollOff); // Smooth Step
} else if (transitionType == 2) {
    attrValue = spline("catmull-rom", transition, startVal, endVal); // Spline
} else if (transitionType == 3) {
    attrValue = startVal + (endVal - startVal) * pow(transition, 2.0); // Exponential
} else if (transitionType == 4) {
    attrValue = startVal + (endVal - startVal) * log(1 + 9 * transition) / log(10); // Logarithmic
} else if (transitionType == 5) {
    attrValue = startVal + (endVal - startVal) * (1 - cos(transition * M_PI)) / 2; // Sinusoidal
}

setattrib(0, "point",attrName, @ptnum,1,attrValue);
ForceGen
Function: Generates angular, central, and directional forces based on distance from a center point. Provides visualization modes for debugging or artistic purposes. Usefull for generating positional and angular velocity for solvers
/*
Script:     forceGen
Version:    1.1
ver_1_0     27.11.2024 - Initial version
ver_1_1     01.2025- cleanup & additional comments

// Function: Generates angular, central, and directional forces based on distance from a center point.
//           Provides visualization modes for debugging or artistic purposes.
*/


// Get visualization mode
int visMode = chi("visMode");

// Get center point position
vector centerP = point(1, "P", 0);

// Define up vector and central vector
vector up = set(0, 1, 0);
vector centralVector = @P - centerP;

// Calculate distance from center and map it to a normalized range
float dist = length(centralVector);
float maxDist = chf("maxDist");
float distMapped = fit(dist, 0, maxDist, 1, 0);

// Calculate angular force
float distMappedAngular = chramp("dist_Angular", distMapped);
vector angularForce = cross(up, centralVector);
angularForce *= distMappedAngular * chf("angular_Mag");

// Calculate central force
float distMappedCentral = chramp("dist_Central", distMapped);
vector centralForce = centralVector * distMappedCentral * chf("central_Mag");

// Calculate directional force
float distMappedDirectional = chramp("dist_Directional", distMapped);
vector directionalForce = chv("directional") * distMappedDirectional * chf("directional_Mag");

// Apply global magnitude and Cd.r scaling
float globalMag = chf("globalMag") * @Cd.r;

// Accumulate forces
v@wForce += angularForce * globalMag;
v@vForce += (centralForce + directionalForce) * globalMag;

// Visualization modes
if (visMode == 0) {
    @N = v@vForce * 1; // Visualize vForce
} else if (visMode == 1) {
    @N = v@wForce * 0.2; // Visualize wForce
}

// Optional: Remove points with zero force (uncomment if needed)
// if (length(v@wForce) + length(v@vForce) == 0) {
//     removepoint(0, @ptnum);
// }
This shader code samples a texture and applies a time-based masking effect to the sampled color. The mask is created using a combination of fractional and sine functions, influenced by the texture’s alpha and red channels. Output color is than masked with mat-collections rain attribute and applied to normal of the shader.
Functionality:
textureSample: This is the input texture sample.
maskA: This value is calculated using the fractional part of the sum of the texture’s alpha channel (texColor.w) and a time-based value. The frac function ensures the value stays between 0 and 1, creating a looping effect.
maskB: This mask is created by applying a sine function to a clamped value. The clamped value is derived from adjusting maskA and the red channel of the texture (texColor.r), scaled by 10 and then clamped between 0 and 3. The result is then multiplied by 6 before applying the sine function.
maskCombined: Combines maskA and maskB using a simple multiplication.outColor: This is the output color, initially set to the sampled texture color. It is then multiplied by the combined mask and scaled by 2.
outColor.z: The blue channel is explicitly set to 1.
return float4(outColor, texColor.a): Returns the final color, ensuring it includes the original alpha value from texColor.
float4 texColor = textureSample; // Sampled texture color

// Calculate a time-based mask value using frac and time variables
float maskA = frac(texColor.w + (time * speed));

// Apply a sine function on a clamped value to create a mask effect
float maskB = sin(clamp(((maskA - 1 + texColor.r) * 10), 0, 3) * 6);

// Combine the masks to get the final mask value
float maskCombined = maskB * (1 - maskA);

// Modify the output color using the combined mask and scale it
float3 outColor = texColor.rgb * maskCombined * 2;

// Set the blue channel to 1
outColor.z = 1.0;

// Return the final color
return float4(outColor, texColor.a);


